Last week we picked up our carrot isolation tents ans this week we started planning for their set up.
As a quick review, we purchased the covers and metal fittings from Redwood Empire Awning in California and had the posts made here. The structures are 1-‘ 20′ and 8’ tall.
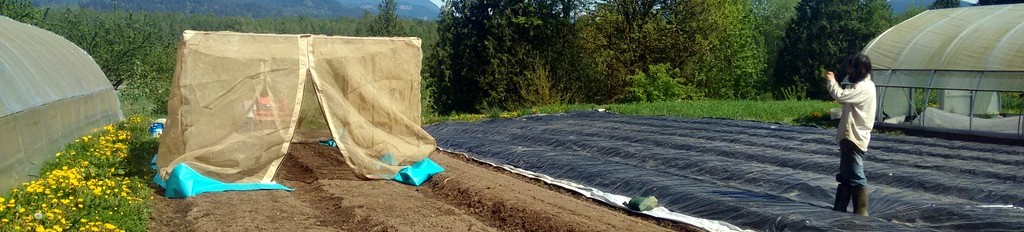
I headed out to Pitchfork Farm with my son to set up the first structure with Jeremy Pitchford.
Setting up the structure was quite easy and we had it pretty much done in 20 minutes. You can watch the time lapse video here (you may want to lower your volume!). After setting it up we did an assessment to determine if it was suitable for our needs. Here are the key notes:
- The tents have flaps at the bottom which are buried in the soil to help keep the structure anchored. Because there were already beds made next to where we were setting up the tent, we would have had to disrupt the beds to make the trench. This would be a problem if a crop was already planted there.
- Lesson: Give space on either side of the tent for set up and trenches to avoid disrupting growing crops
- We pushed the posts into the ground to help stabilize the structure which reduced its height from 8′ to about 7′. This has a few effects:
- The height being reduce means the air flow will also be reduced
- Now the flaps and about a foot mesh will be buried in the soil, which will shorten the life of the mesh. Since the tent only needs to be up for 6-8 weeks, the less time it spends outside and in the soil the longer it will last
- Lesson: There are two things to consider here:
- Use longer posts: If we used 9 1/2′ or 10′ posts they could be sunk 2′ into the soil and leave the flaps flush with the soil as they should be and the end height at 8′
- Use anchors: We are using 1 3/8″ posts; so by sinking 2′ pieces of 1 1/2″ tube in to the ground we could then lower the tubes into the anchors to brace the posts. This is the method we will use.